A kitchen backsplash transforms the space behind your stove and sink from a blank wall into a design statement. For years, that meant grout lines, tile cutters, and hiring a professional. A peel and stick backsplash changes the game, it delivers the look of real tile or stone, sticks directly to clean wall surface, and requires nothing more than a heat gun and patience. Whether you’re renting and can’t alter walls, updating a dated kitchen on a budget, or simply tired of plain drywall, this DIY solution works. No special skills, no permits, no demolition. Just measure, stick, and smooth. The shift toward easier home improvement projects has made peel and stick finishes mainstream in 2026, and kitchen backsplashes are leading the charge.
Table of Contents
ToggleKey Takeaways
- A peel and stick backsplash delivers professional tile or stone looks for $100–$400, compared to $1,500–$3,500 for traditional installation, making it an affordable DIY kitchen update.
- Proper wall preparation—including degreasing, sanding textured surfaces, and filling holes—is essential for a peel and stick backsplash to last 5–10 years without peeling or bubbling.
- Installation takes just 3–4 hours with no special skills required: measure your centerline, peel and position sheets gradually in thirds, trim outlets with a utility knife, and heat seams to activate the adhesive fully.
- Modern peel and stick backsplash products use marine-grade adhesive and moisture-resistant backing that withstand kitchen humidity and cooking splashes, though proper ventilation and immediate spill cleanup extend durability.
- Subway tile and hexagon patterns dominate peel and stick designs, while geometric styles add personality but date quickly—choose satin finishes for easy cleaning or matte for hiding smudges.
- Seams and edges are the weak points requiring regular inspection; if lifting occurs, gently re-stick corners with contact cement, and avoid abrasive scrubbers or harsh chemicals to protect the vinyl adhesive.
Why Peel And Stick Backsplash Is The Perfect DIY Solution
A traditional tile backsplash demands grout, mortar, a wet saw, and hours of cutting and cleanup. Peel and stick removes those barriers. The self-adhesive backing means no tile adhesive, no curing time, and no grout haze to wipe away for days afterward.
Budget is another advantage. Ceramic or glass tile backsplash installation easily runs $1,500 to $3,500 when you factor in material and labor. A high-quality peel and stick backsplash kit covers the same area for $100 to $400. That cost difference lets homeowners refresh their kitchen without financing a remodel.
Durability has improved significantly too. Modern peel and stick products use marine-grade adhesive and moisture-resistant backing, which means they hold up to kitchen humidity, cooking splashes, and steam without peeling at the corners. They won’t replace tile in a rental flip or forever home where resale value matters most, but for temporary updates or renters, they’re durable enough for years of daily use.
The installation speed seals the deal. A backsplash that takes a professional tiler three to four days takes you three to four hours. There’s no dust, no noise, and neighbors won’t complain about saw cutting at 8 a.m. You can finish on a Saturday and cook Monday night with confidence.
Choosing The Right Peel And Stick Design For Your Kitchen
Before you buy, measure your backsplash area. Most kitchens need coverage from countertop to cabinets, typically a 18-inch-tall band running 6 to 12 feet depending on your layout. Measure width and height, then add 10 percent for waste and pattern matching.
Material matters. Vinyl peel and stick backsplash is the most affordable and flexible, it wraps corners and cuts easily with a utility knife. Fabric-backed peel and stick (which resembles real wallpaper) adds texture and can hide minor wall imperfections, though it’s pricier and trickier around grease. Faux-tile options with textured 3D surfaces mimic real subway or hexagon tile but cost more than flat vinyl versions.
Sealing and sheen affect both looks and maintenance. Matte finishes hide smudges and splatter but show dust. Semigloss or gloss finishes wipe clean easily and reflect light, making kitchens feel larger, but they highlight every fingerprint. For busy kitchens, a satin finish splits the difference.
Popular Styles And Patterns
Subway tile remains dominant. The 3-by-6-inch brick pattern works with modern, farmhouse, and transitional kitchens. Offset (running bond) patterns look more intentional than straight stacks.
Hexagon tiles suit contemporary and bohemian kitchens. Smaller hex patterns (1 to 2 inches) read as busy: larger ones (3 to 4 inches) feel bolder.
Geometric patterns, chevron, herringbone, or Moroccan, add personality but can date quickly. Reserve these for kitchens where you plan frequent updates.
Solid color or faux-stone options work if you want texture without pattern. Light neutrals expand small kitchens: dark colors or marble effects add drama but can feel heavy in tight spaces. Design inspiration abounds on Houzz and Remodelista, where real homeowners post installations next to their actual cabinetry and countertops.
Preparing Your Kitchen Walls For Installation
Surface prep determines whether your backsplash lasts five years or peels off in six months. This step is not optional.
Start by cleaning the wall with warm soapy water and a sponge. Scrub away grease splatter, dust, and cooking film. Standard dish soap works fine. Rinse thoroughly and let dry completely, this matters because adhesive won’t grip wet or oily surfaces. If you’ve had the same backsplash for years, you may need a degreaser. Products like Zep or a 50/50 vinegar-water solution cut stubborn buildup. After degreasing, rinse again and wait at least two hours for the wall to fully dry.
Inspect the wall surface. Peel and stick works best on smooth, painted drywall. If your wall has textured paint or popcorn finish, sand it lightly with 120-grit sandpaper to smooth the peaks. This takes 15 minutes but prevents air bubbles during installation. If the wall is slick (high-gloss paint), rough it up slightly with 150-grit sandpaper so the adhesive grips.
Fill any holes, dents, or gaps with drywall spackle. Sand smooth once dry. Caulk the seams where backsplash meets countertop and side walls with paintable silicone caulk, this seals gaps and prevents water from wicking behind the peel and stick. Let caulk cure per the tube’s directions (usually 24 hours).
If your existing backsplash is old tile, you can stick peel and stick over it if the grout is solid and the tiles aren’t loose. Just clean and lightly sand it. If tiles are popping off or the wall feels unstable, remove the old backsplash first, this isn’t the time to skimp.
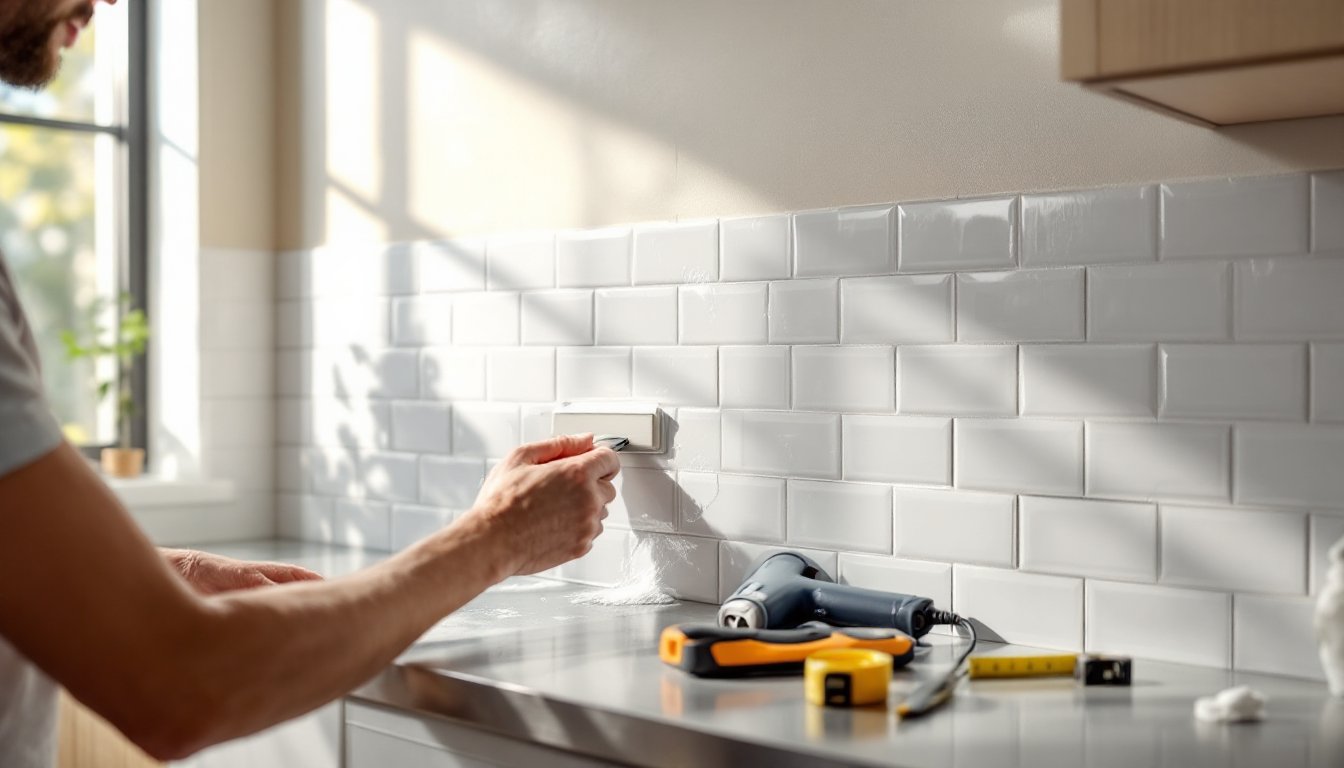
Step-By-Step Installation Guide
What you’ll need: Peel and stick sheets, utility knife, metal straightedge, heat gun, squeegee or plastic smoothing tool, measuring tape, pencil, safety glasses.
Start by finding your centerline. Measure the width of your backsplash area and mark the midpoint with a light pencil line running top to bottom. This prevents you from ending with a sliver of pattern on one side. It’s easier to adjust before you start sticking.
Step 1: Test-fit without adhesive. Peel back the corner of the first sheet and lay it against the wall aligned with your centerline. Don’t commit yet, just see how the pattern flows and where seams fall. Adjust the layout to avoid tiny slivers or awkward cuts around outlets.
Step 2: Peel and position the first sheet. Starting in the center, slowly peel the backing from the top third of the first sheet. Align the top edge with your pencil line and press firmly. Use a squeegee to smooth out air bubbles, working from center outward. Avoid pressing too hard, you don’t want wrinkles.
Step 3: Continue peeling and smoothing. Gradually peel the backing downward, pressing as you go. Work in thirds to avoid trapping large air bubbles. If bubbles appear, use a heat gun on low (around 250°F) held 6 inches away to soften the adhesive, then smooth with the squeegee.
Step 4: Trim around outlets and edges. Once sheets are in place, use a utility knife and straightedge to cut out outlet holes. Measure twice. For seams, overlap sheets slightly and cut through both layers with a fresh blade, then remove the waste. This creates a perfect match.
Step 5: Heat and set the seams. Run a heat gun slowly along all seams and edges. The warmth activates the adhesive fully and bonds overlaps. Don’t overheat, you’re aiming for 30 to 45 seconds per linear foot.
Step 6: Apply perimeter trim (optional). Some peel and stick kits include edge trim or a matching border. These seal the edges and hide minor imperfections. Stick these last, after the main sheets have fully set (24 hours).
Wait 48 hours before splashing water or exposing the backsplash to heat. The adhesive needs time to cure fully.
Maintenance And Longevity Tips
Peel and stick backsplashes handle kitchen duty well if you treat them right. Wipe spills immediately with a damp cloth, this prevents moisture from soaking into seams. For grease splatter, use a soft cloth and a little dish soap or degreaser. Avoid abrasive scrubbers, scouring pads, or harsh chemicals like bleach, which can degrade the vinyl or adhesive over time.
Seams are the weak point. Check the edges and corners every few months, especially the top seam near the upper cabinets where steam tends to collect. If you notice lifting, carefully peel back the corner, wipe away any dust or debris, and re-stick it. A dab of contact cement under the edge helps too. If an entire sheet begins to buckle or bubble near the middle, you may need to remove and replace it, heat it gently to soften the adhesive and peel slowly.
Moisture control extends life. Run your kitchen exhaust fan during cooking and for 20 minutes after, or crack a window. Humidity accelerates degradation of the adhesive and can cause mold under vinyl. If your kitchen is particularly steamy (island stove, no ventilation), peel and stick may not last beyond three to five years, this is where proper venting matters more than material choice.
Direct heat from a stovetop or oven shortens lifespan. Install the backsplash at least 12 inches above a gas burner or 6 inches above an electric coil. If your cooktop is flush against the wall, consider using a traditional backsplash material instead.
For a kitchen redesign, removal is straightforward. Heat the sheets gently with a hair dryer (not a heat gun), then peel slowly from a corner. Most adhesive will come off with the vinyl. Any residue wipes away with rubbing alcohol. Your wall returns to bare drywall, ready for the next project.
Conclusion
A peel and stick kitchen backsplash transforms one of the most visible areas of your kitchen without the mess, cost, or commitment of traditional tile. With proper surface prep and careful installation, you’ll get a durable, professional-looking finish that can last five to ten years. The technique is approachable enough for first-time DIYers but still rewards attention to detail. If your kitchen needs a refresh and you’ve got a Saturday free, this is your project. Browse design galleries on The Kitchn for real-world inspiration, grab a peel and stick kit, and get started.